Presidio Purse Revisited


Hi Everyone! The weather here is finally warm enough to consider taking pictures outside and showing off what I have been working on- my adaptation of the Presidio Purse!

In case you missed it, Seamstress Erin has just finished a sew along of her latest pattern, the Presidio Purse.The bag is very generous in size and not difficult to construct, but after making my first one, I really wanted something that was more on a smaller scale for everyday use. So… I set to work…

The first thing I did was to measure and compare the sizes of bags I already have. That “research” revealed that most bags I have were an average of 1 3/4 inches shorter than the Presidio Purse. Not really that much of a difference, but I still felt that the size was not right for me.

With that information, I started to modify the pattern by overlapping the bottom portion of the pattern by that 1 3/4 inches. Then I made some adjustments to the combined side/bottom piece and created a muslin. I knew right away that this was not the “look” I was going for, either. There was still something that was “too big” but progress was being made!

Then I decided maybe I could eliminate the side/bottom piece altogether and create depth to the purse by adding darts! Ding ding ding…We have a winner!

Here you can see the pattern changes in order:

Overlap the bottom portion of the front/back pierce 1 3/4″ and shorten the bottom portion of the zipper pocket piece by the same amount. (I just folded it under). The darts are 1″ long with a total take-up for each dart at 1 1/2″.


On the front & backI used a woven fusible interfacing and also on the following lining pieces:

  • 1 lower zipper pocket piece
  • 2 handles
  • 2 handle anchors
  • small pocket piece*

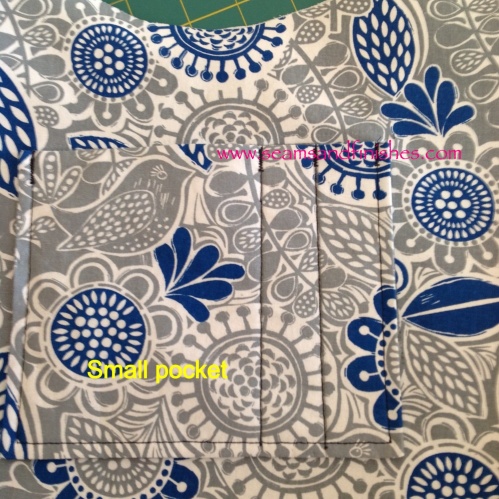
* I cut the small pocket on the fold, interfaced half of it and sewed it right sides together, leaving an opening to turn right sides out. (No raw edges ).


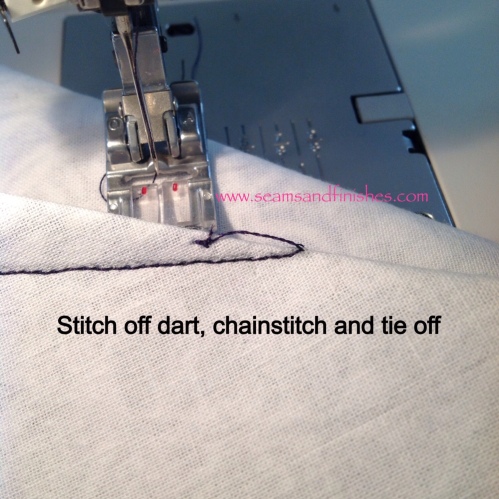
A close-up of sewing the darts: To eliminate the dimple at the point of a dart, stitch off the point and continue stitching a thread chain. Lift your presser foot an re-position the needle within the dart fold and tie-off.

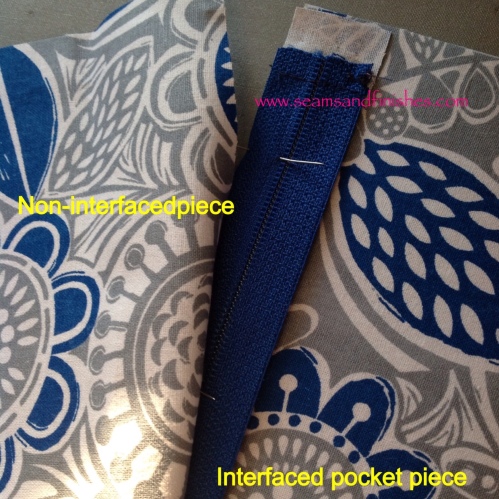
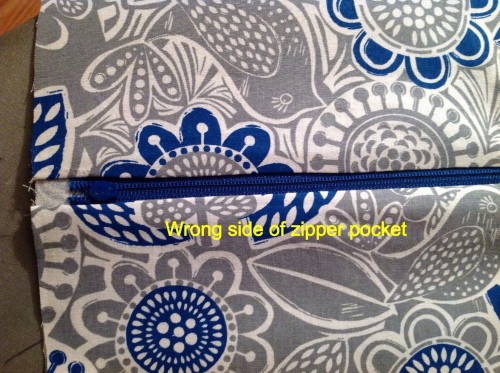
Sandwich the zipper between the 2 lower large pocket pieces, having the one with the interfacing on the bottom. Repeat with the remaining top pocket pieces and neither of these pieces is interfaced. (This is the same technique used for inserting the main zipper in the Presidio Purse.)


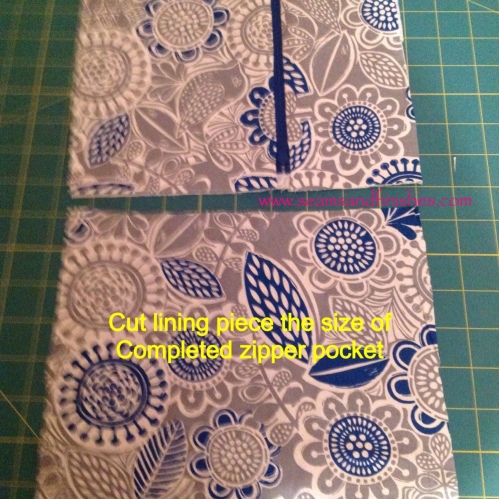
Cut pocket lining the same size as completed zipper pocket.


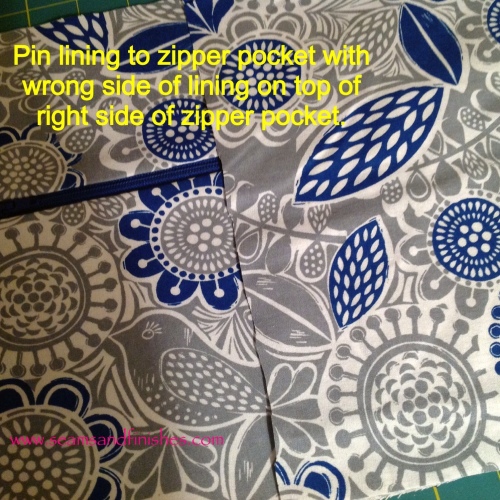
Place WRONG side of this piece on top the right side of the zipper pocket. Stitch together with 1/4″ seam on 3 sides, leaving top open. Trim corners & turn to right side & press. When this pocket assembly is stitched to the lining with 1/4″ seam, there will be no raw edges inside, and the right side of the lining is visible when you unzip the pocket!

Small pocket stitched to lining (reinforced with bar tacks).


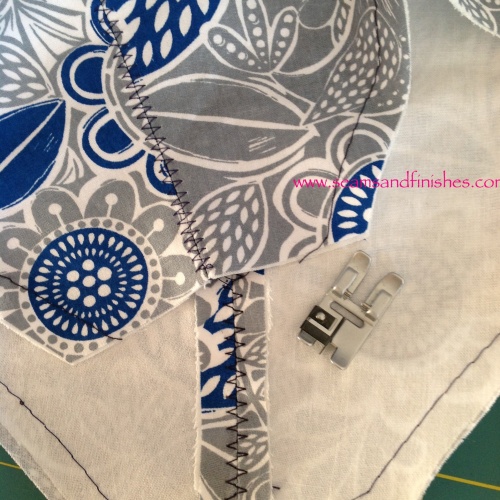
Once the pockets were stitched to the front & back lining pieces, it was time to stitch the front & back together. After doing this, I pressed the seams open and used a 2-step zig-zag stitch along the seam to keep it open.

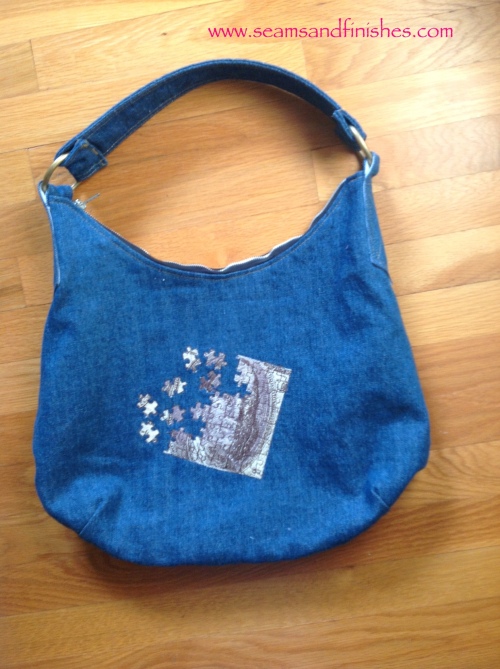
Now, onto the bag, itself! I was able to find some 10 oz. wt denim at Joann's and that was perfect, because I wanted to make this bag very casual and do some machine embroidery on the front! (I'll get to that, shortly!)

Embroidery done and bag assembled, here are a few details:

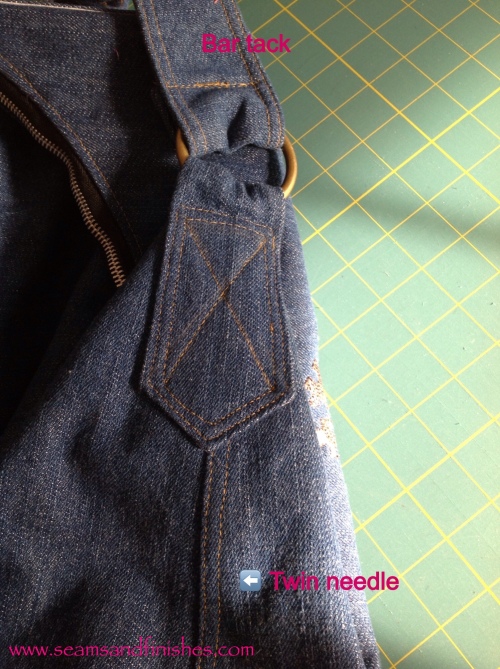
  • Top stitched the seam using a 6.0/100 needle with regular thread. I have not had a great deal of luck using top-stitching thread in the past. If you like more definition, you can thread the needles with two of the same weight thread to get a slightly thicker appearance or use 2 different colors in the same needle for an even different look!
  • For top stitching handle & anchors and construction, a jeans/denim size 100 needle was used.
  • Bar tacks were added on the handle after I attached it to the ring for extra security, and it goes along with a jeans style!
  • The 2″ rings were ordered from Pacific Trimming.


Here is the finished bag!

The design is from “Worth Every Penny”, a collection found here.

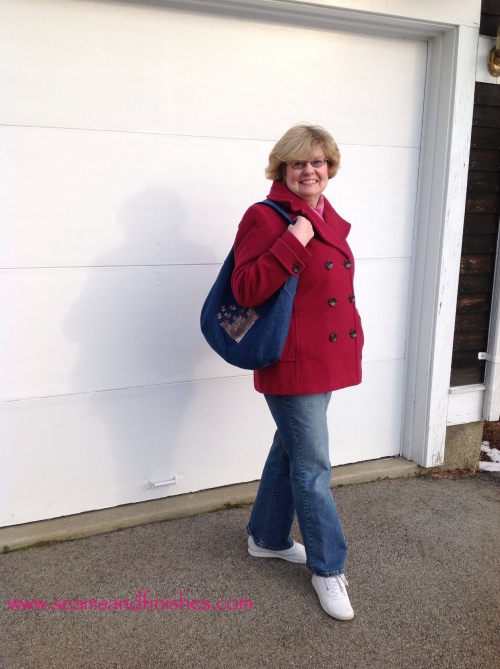
And here is the bag in action!


Presidio Purse Pattern

Seamstress Erin has just released her first pattern, The Presidio Purse! In fact, she is currently hosting a sew-along, so you still have the opportunity to join her in making one of your own!

Presidio Purse

Early last month Erin selected a group of volunteers to test this pattern. With a 2-week deadline and the holiday rush, I quickly got to work. The pattern is downloadable for either a copy shop or home version. I printed it at home and was done in no time.

Next stop: The Large Fabric Store Chain.

Now, the original description given was that this purse could be carry-on luggage size, and the recommended interfacing would be firm. I chose to interface my lining with a fusible that is recommended for handbags. Although it worked-out fine, it was not easy to sew and difficult to maneuver under the machine. I had to wrestle with it, like working with a life vest! Check-out Erin’s discussion here outlining fabric selection choices.

Presidio Purse

The directions and illustrations for making this purse are well thought out. I did make a couple of changes to the pockets by interfacing them for sturdiness & functionality and lining them so there are no raw edges, but these are my personal preferences.

Presidio Purse interior

For the hardware I used a 2″ D-ring which was not rectangular and I’m very pleased. One thing I really like about this purse is the length of the handle and its orientation on the bag – it feels very comfortable slung over my shoulder!

What’s next?

Well, I’m going to be making a second Presidio Purse (pre-shrinking fabric as I type), but I’m going to experiment with scaling the size down a little as this bag a lot larger than I am used to using regularly. Plus I have a few “embellishment” ideas percolating.

The shape of this bag just beckons playing around with design elements like color blocking, jeans recycling, embroidery, fabric stamping, pleating, tucks…

Is there a Presidio Purse in your future?

Happy Fall Y’All!

Today was such a beautiful day here in southern New England- a cloudless blue sky, shirt sleeve weather and the trees pretty close to “peak color”. It was the perfect day to bring a couple of my “friends” outside for a photo shoot!

Scrabble Jack

Meet Scrabble Jack from Happy Hollow Designs. His usual place of honor is in the front entrance to our home, but he agreed that today was just the perfect day for soaking up some warm rays of sunshine!

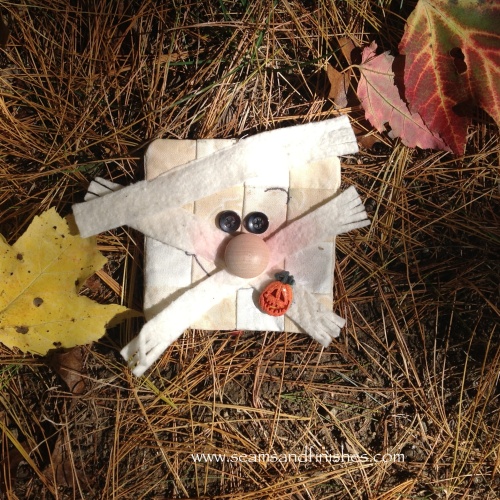
Not wanting to miss out on the field trip outside, My Mummy begged to tag along too!

My Mummy

Mummy

Scrabble Jack is made using a fusible grid fabric and your own choice of fabrics. I purchased some fat quarters and cut them just shy of 2″ square and fused them to the grid, as directed. Once all of your pieces are fused, you sew the rows in 1/4 ” seams! I tried to duplicate the colors and shading of the original, and am very happy with the result. In addition, I purchased the accessory kit which included the raffia, buttons and scrabble tiles to make Jack come to life.

The Mummy comes in an Espresso coffee cup with all the parts necessary to complete him. There are several other cute Espresso designs on the website Including some Christmas kits. I'm thinking cute ideas for a holiday swap.

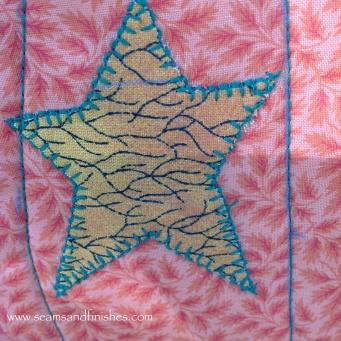
Next up is my pumpkin table runner. My quilting experience does not extend much beyond what I show here. This is done completely by machine, including the blanket stitching around the star applique.

Pumpkins

Pumpkins

Applique

Applique

Now that the sun has set (a beautiful pink and orange sky) my friends have returned to their customary posts in the house, very important, and very festive!


National Sewing Month

Hi Everyone!

Inspired by Sew Mama Sew, and National Sewing Month I'm sharing a sewing tool and tip with you today on Centered Zipper Application!

The Tools:

  • 1/2″ wide frosted cellophane tape
  • plastic 1/8″ see-through ruler
  • waxed paper
  • pen or permanent marker

The Process:

  • Machine-baste your zipper opening closed as per most zipper directions and press the basted seam open.
  • Next, open the zipper and placing teeth along basting, machine baste the zipper to the seam allowance only (usual zipper directions)
  • Using your zipper measurement as a guide, stick that length of the frosted tape to a piece of waxed paper.
  • Draw a line down the center of the tape using the ruler.
Centered zipper

Preparing the tape

  • Now, carefully creep the tape along the basted opening so that the line drawn is right on top of the basting line.
  • Topstitch your zipper, peel off the tape and re-stick the tape to the waxed paper for the next time!

Centered zipper

Top stitching

Centered zipper

All stitched

Centered zipper

Finished


A Few Programming Notes:

  • Selecting a zipper which is longer than what you need (as I did here) will eliminate “zipper gymnastics” of trying to get around the zipper tab at the top. You will cut-off the extra zipper tape AFTER you sew across the top of the zipper.
  • The top-stitch length is 3-3.5 mm, and I used a lighter thread color for illustration.
  • As far as which direction to sew the zipper, there are two schools of thought: Stitch from the bottom to the top, or just stitch all around starting and ending at the top. Whatever works for you and your fabric is what is important!

The first picture above shows the beginning of “Stitch from the bottom, etc.” When I did the second side, I was not happy with how it looked so I took it out and re-did it using the “Start and end at the top” method.

In choosing to start at the bottom, it is crucial to pull your threads to the inside and hand-tie them so no one knows where you stopped and started!

Take a look at other tips shared at Sew Mama Sew and celebrate National Sewing month with a new tool or technique!


The Sew Weekly Reunion


The Facts

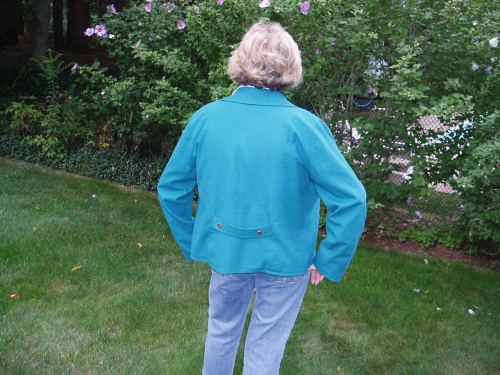
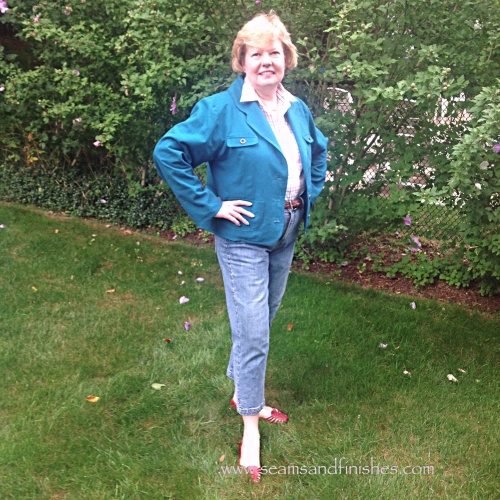
Fabric– linen/rayon blend

Notions– 7 buttons $6.50

Pantone Color Challenge Color – Emerald

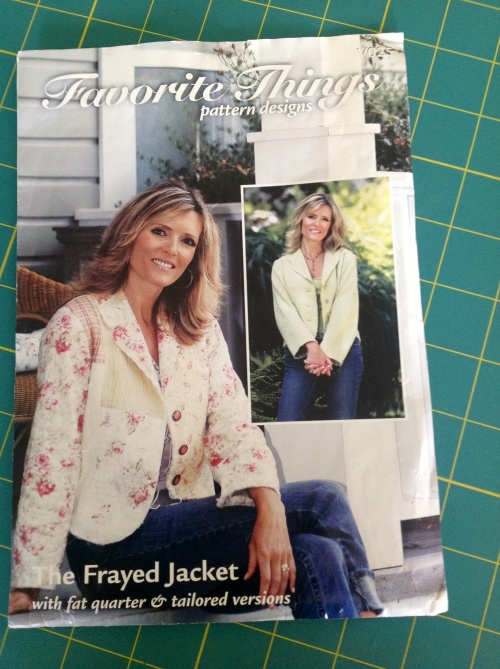
PatternThe Frayed Jacket from Favorite Things (2005)

Time to complete– longer than anticipated- off an on over 2 weeks, 24 hrs??

I made the quilted version of this jacket circa 2005 and anticipated making the tailored view soon after, but a lot of water has flowed under that bridge and it didn't happen. Suffice it to say that this jacket has a different fit without the batting between the layers so I needed to take the seams in, throughout. The sleeves are still not as close fitting as I would like. I am planning a future post to compare the two jackets.

First worn– for photo shoot

Wear again – yes

Total cost– Pattern-($14 on hand)

Fabric- ( on hand $30-$45.00 based on JoAnn's fabrics prices without using a coupon, but most likely, I took advantage of sale & coupon pricing.)

Total recent expenditure was only for the buttons – $6.50


I used two different cameras to try and capture the true color of this jacket. IRL, the jacket matches the Pantone Emerald. The first photo was the closest color match.


Avoiding the Hot Seat

My car has leather seats. Needless to say, recent high temperatures and humidity have made the whole “being-in-the-car” experience a little uncomfortable, shall we say?

I have been looking for a simple solution in the way of a seat cover and adapted this idea (Click the link on that page to get the PDF directions)

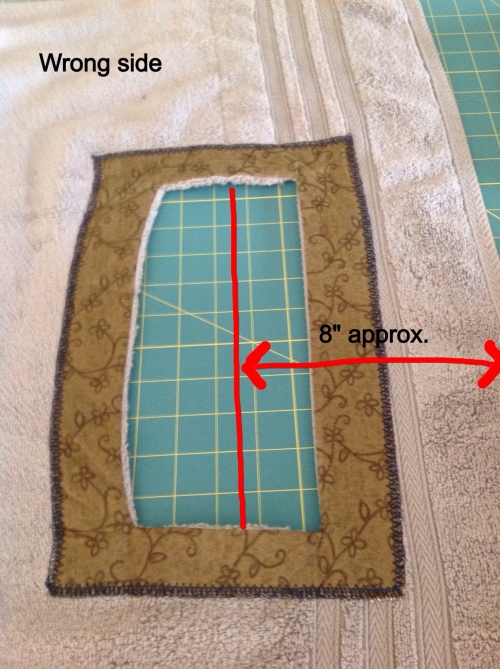
Instead of using fabric, I substituted a bath towel (30.5″x52″).

Next, I interfaced the contrasting patch fabric and centered it on the towel approximately 8″ from one of the ends.

I did not add any further fastenings or ties to hold the cover in place on the seat, as I didn’t feel it necessary.  As a result,  the towel does need to be “arranged and re-arranged” upon getting in and out of the car. Not a big deal. 🙂

A big plus to me in addition to the fact that these seat covers are easy to put on and off, is that they can be easily used outside of the car for impromptu picnic or bleacher sitting and easily laundered. (Yay)

I noticed lots of other sewing ideas on the Husqvarna-Viking site. I think I’ll go back and look around a little more. How about you?

Namaste

My experience with yoga does not extend much beyond Wii Fit and similar DVD exercise routines (admittedly not practiced on a regular basis).

However, with all good intentions of exercising more during the winter months, I did something that is still referred to as: “I still can’t believe you did that!” Which is wait in line at Target (I was #3), before the store opened in the hopes of purchasing one of the 12 systems they had in stock.

Arriving at Target that early morning, I joined with a handful of other customers, most likely there to secure the scarce and coveted Wii.

At 7:00 AM, security guard and a store Associate promptly came to the door, and asked if we were there to purchase the Wii. When our intentions were confirmed, each of us were handed “Golden Tickets”and escorted as a group to the electronics counter to make our purchases. I was back home and my mission completed by 8:00AM! It was unknown that I had even left the house!

I’m leading up to the dramatic sewing part…

Based on the introduction to Yoga on the Wii, my daughter has been a regular practitioner of this exercise, attending a weekly class and often using a Yoga App or other online in-between.

As any machine embroiderer might know, any hobby, interest, affiliation or celebration is worthy to be championed by embroidered embellishment! So I just happened to find these Yoga Designs, and decided they would be *necessary* for my Embroidery Designs Collection.

A towel would be the ideal project for one of these designs! After all the pre-embroidery preparations, I was ready to get down to business at the machine. The first basting around the hoop/design was perfect and the first part of the design, the word “Namaste” was about to be stitched. About at the middle of the letter “m” the machine was very unhappy- noises, growls,- snap- needle breaks- re thread, re-start- things are sort of okay, but maybe not. The word was finished, it looked fine, so I continued through the color changes and completed the design. Flipped it over to see BIRD’S NEST behind Namaste. That will never fly. ( Didn’t mean the play on words, but it is none-the-less appropriate.)

The secret is never to unhoop until you are sure that the stitch-out is successful, so if you have to rip-out or “negatively stitch” something, you have a better chance of getting your design lined up properly.

Here is my design after ripping-out those stitches.

And here is the finished one

Ripping-out and re-doing is part of the sewing process. In fact, when the need arises, I find myself thinking about and planning the next steps in the project, etc. There is a mantra to this. I think it’s very “Zen”, sewing Zen.

Do you have a “Sewing Zen”?

Namaste


What I did on my summer vacation

The familiar words above were certain to greet us as we returned to school each Fall.  We were challenged to write about our adventures and experiences as our first assignment from our new teachers. I don’t think of myself as a writer, but here I am, dipping my toe into the waters of blogging at the suggestion/encouragement of my daughter who blogs and administers here. I hope I do not disappoint 🙂 Working my way through WordPress and Blogsy and it is a little daunting in places, but once that Publish button is pressed and I see what results- I feel a sense of accomplishment, and its all good! What shall I write about? Well my blog title refers to seams (as in sewing) and finishes (as in finishing a seam to preserve its integrity and appearance), so perhaps sewing will be my focus. But I also dabble in machine embroidery, and I like to cook too, and craft a little bit… I think these are some starting points! Thank you for joining me, I hope you will stop by again. Now to  learn a new skill:  uploading and captioning a picture from my summer vacation!

Chatham,MA

Chatham, MA