Presidio Purse Revisited


Hi Everyone! The weather here is finally warm enough to consider taking pictures outside and showing off what I have been working on- my adaptation of the Presidio Purse!

In case you missed it, Seamstress Erin has just finished a sew along of her latest pattern, the Presidio Purse.The bag is very generous in size and not difficult to construct, but after making my first one, I really wanted something that was more on a smaller scale for everyday use. So… I set to work…

The first thing I did was to measure and compare the sizes of bags I already have. That “research” revealed that most bags I have were an average of 1 3/4 inches shorter than the Presidio Purse. Not really that much of a difference, but I still felt that the size was not right for me.

With that information, I started to modify the pattern by overlapping the bottom portion of the pattern by that 1 3/4 inches. Then I made some adjustments to the combined side/bottom piece and created a muslin. I knew right away that this was not the “look” I was going for, either. There was still something that was “too big” but progress was being made!

Then I decided maybe I could eliminate the side/bottom piece altogether and create depth to the purse by adding darts! Ding ding ding…We have a winner!

Here you can see the pattern changes in order:

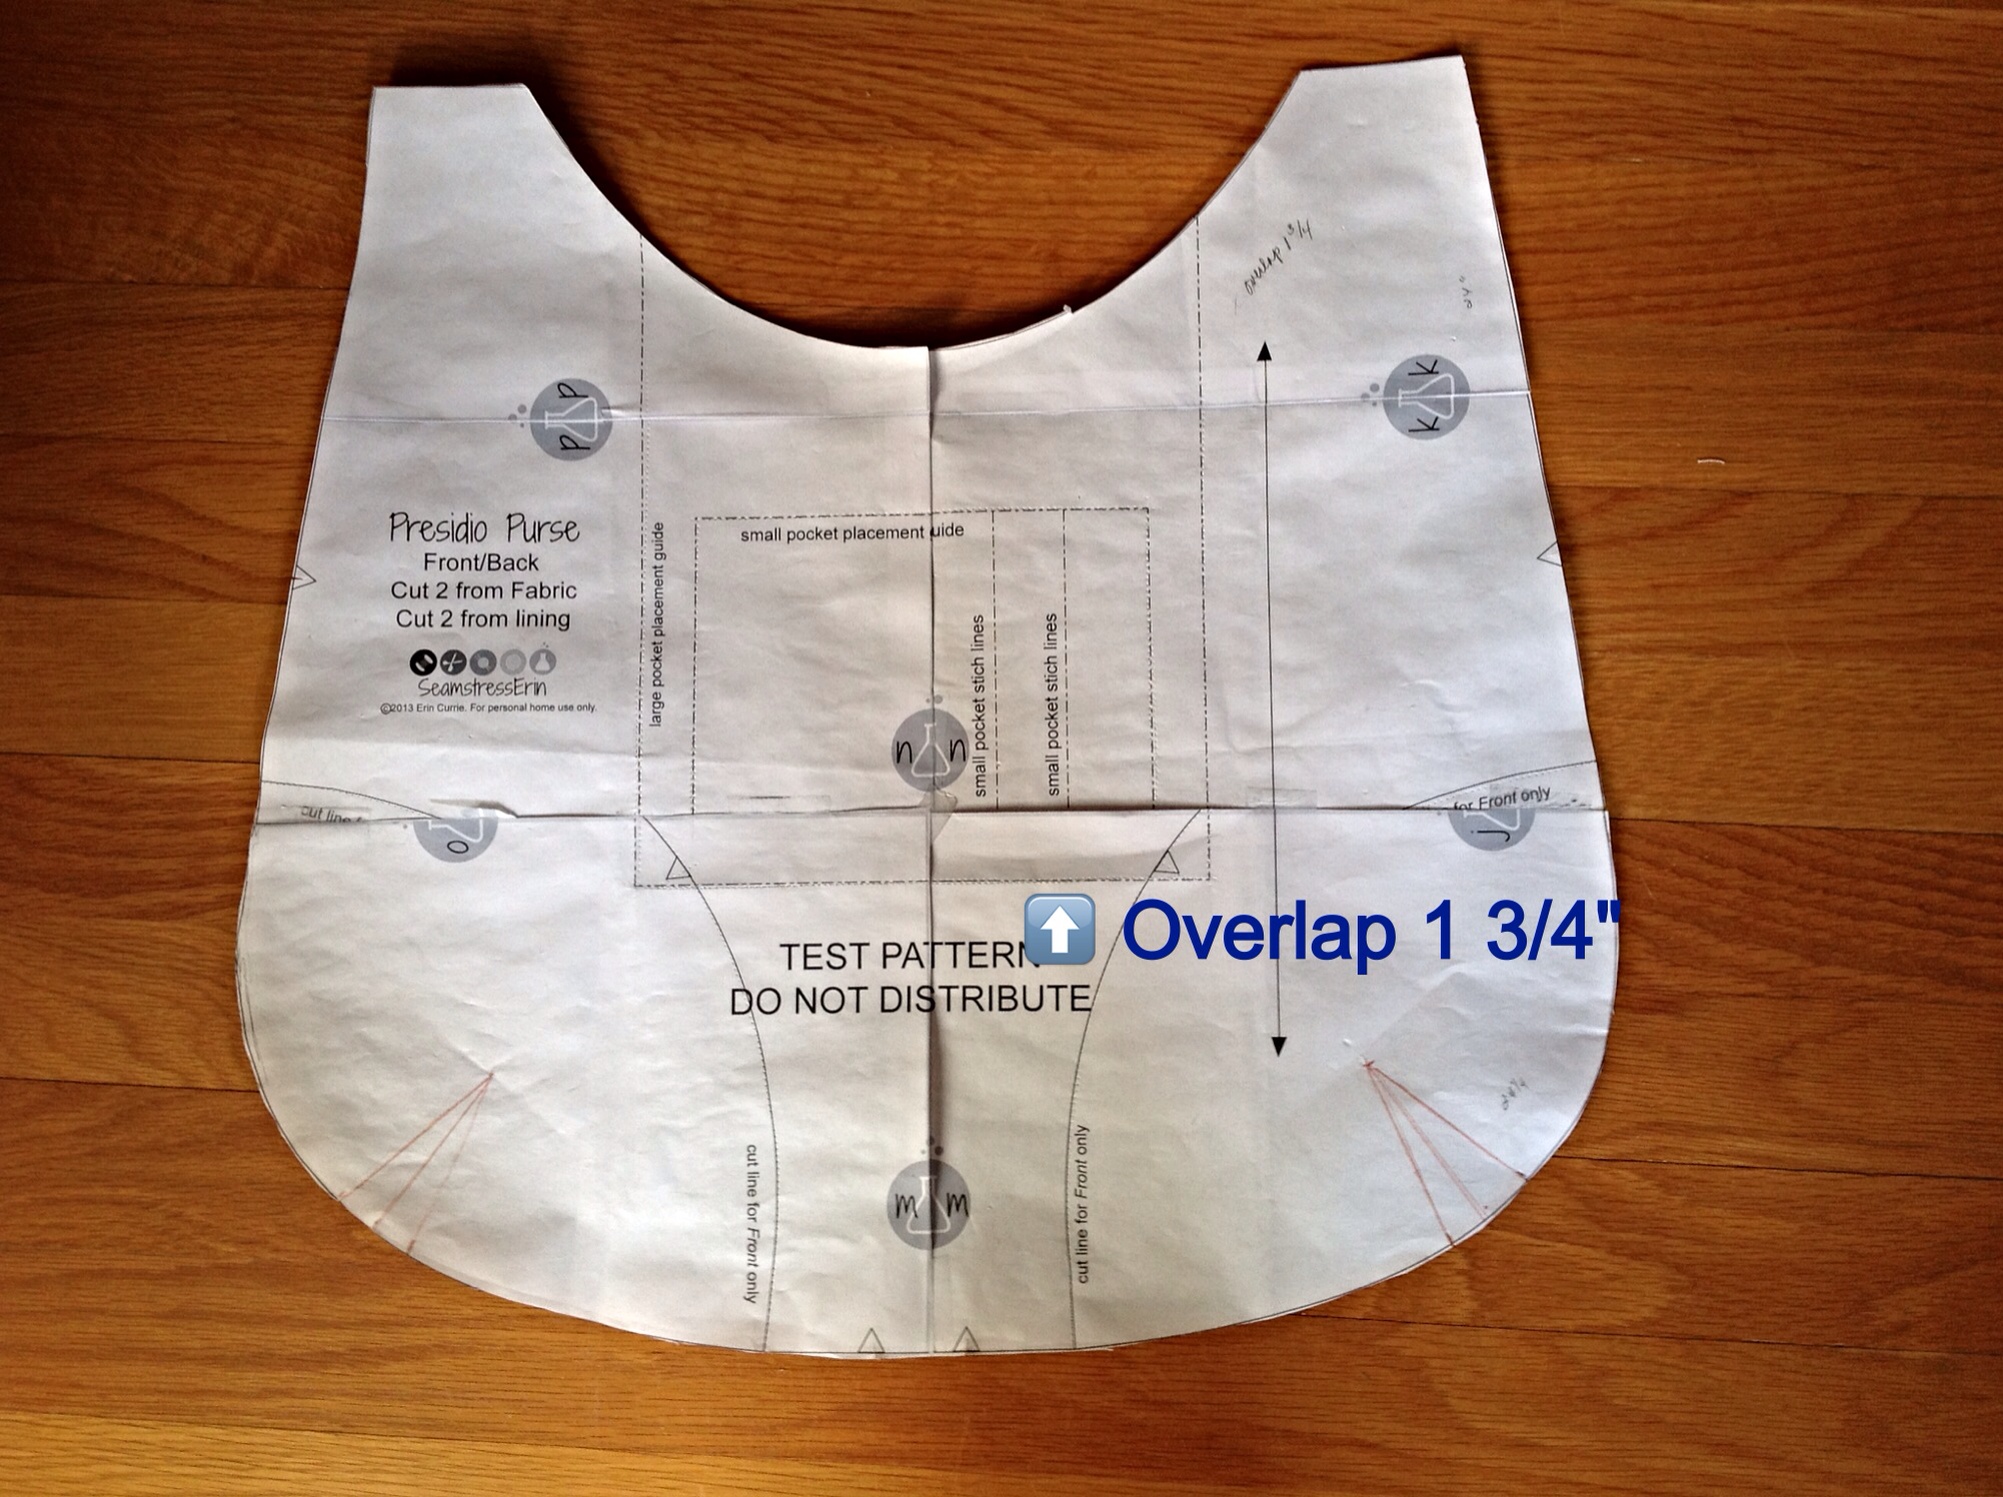
Overlap the bottom portion of the front/back pierce 1 3/4″ and shorten the bottom portion of the zipper pocket piece by the same amount. (I just folded it under). The darts are 1″ long with a total take-up for each dart at 1 1/2″.


On the front & backI used a woven fusible interfacing and also on the following lining pieces:

  • 1 lower zipper pocket piece
  • 2 handles
  • 2 handle anchors
  • small pocket piece*

* I cut the small pocket on the fold, interfaced half of it and sewed it right sides together, leaving an opening to turn right sides out. (No raw edges ).


A close-up of sewing the darts: To eliminate the dimple at the point of a dart, stitch off the point and continue stitching a thread chain. Lift your presser foot an re-position the needle within the dart fold and tie-off.

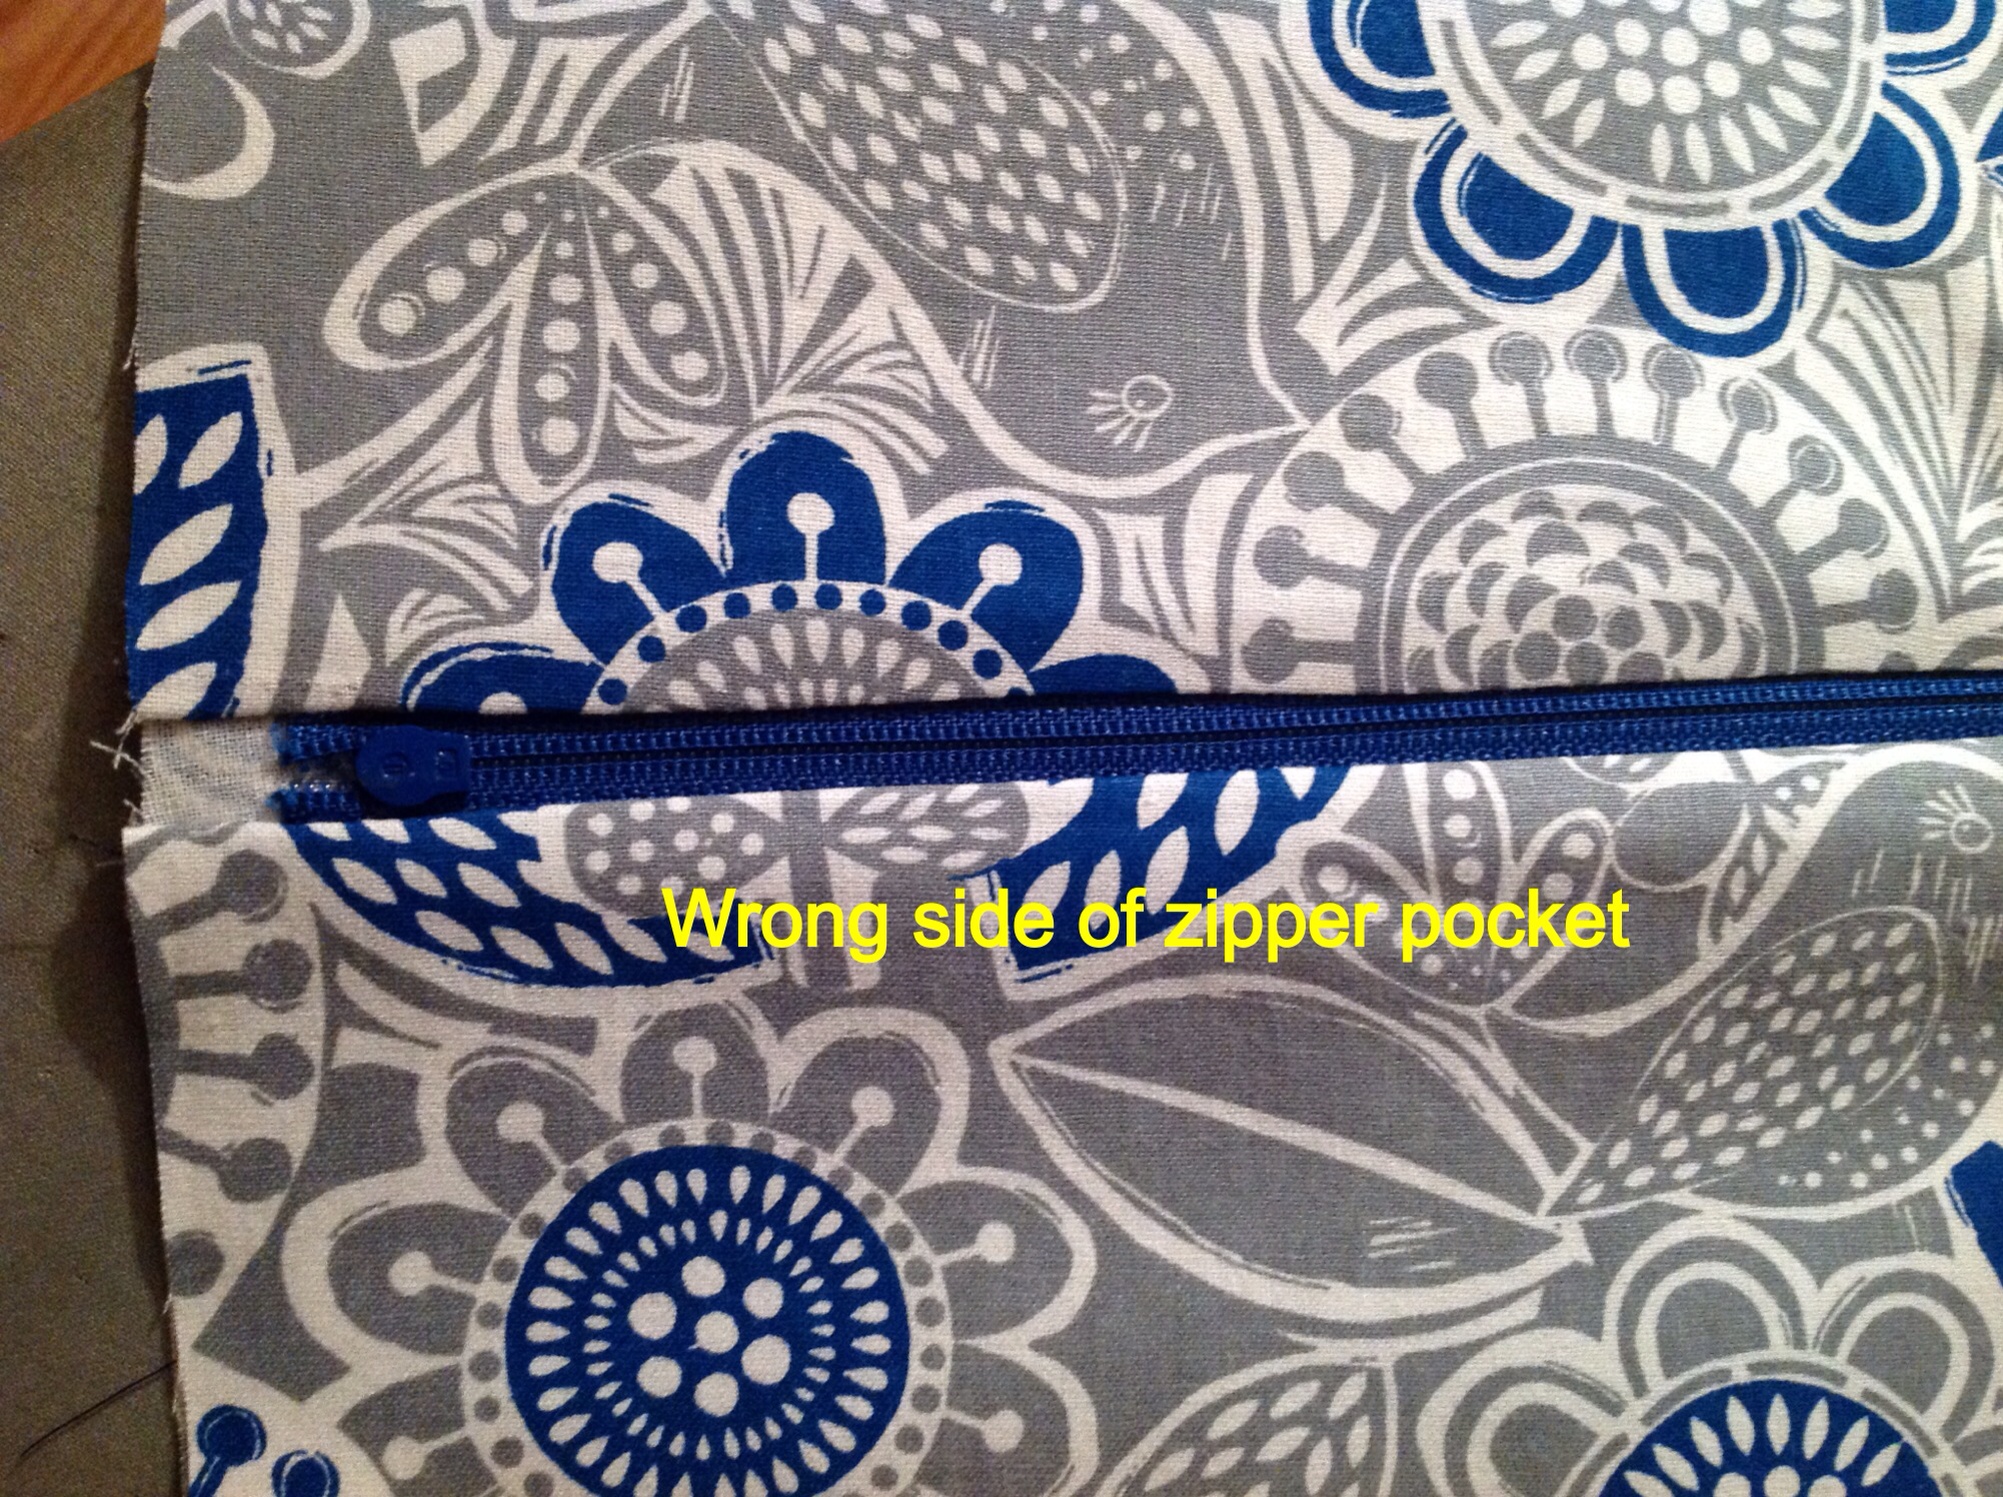
Sandwich the zipper between the 2 lower large pocket pieces, having the one with the interfacing on the bottom. Repeat with the remaining top pocket pieces and neither of these pieces is interfaced. (This is the same technique used for inserting the main zipper in the Presidio Purse.)


Cut pocket lining the same size as completed zipper pocket.


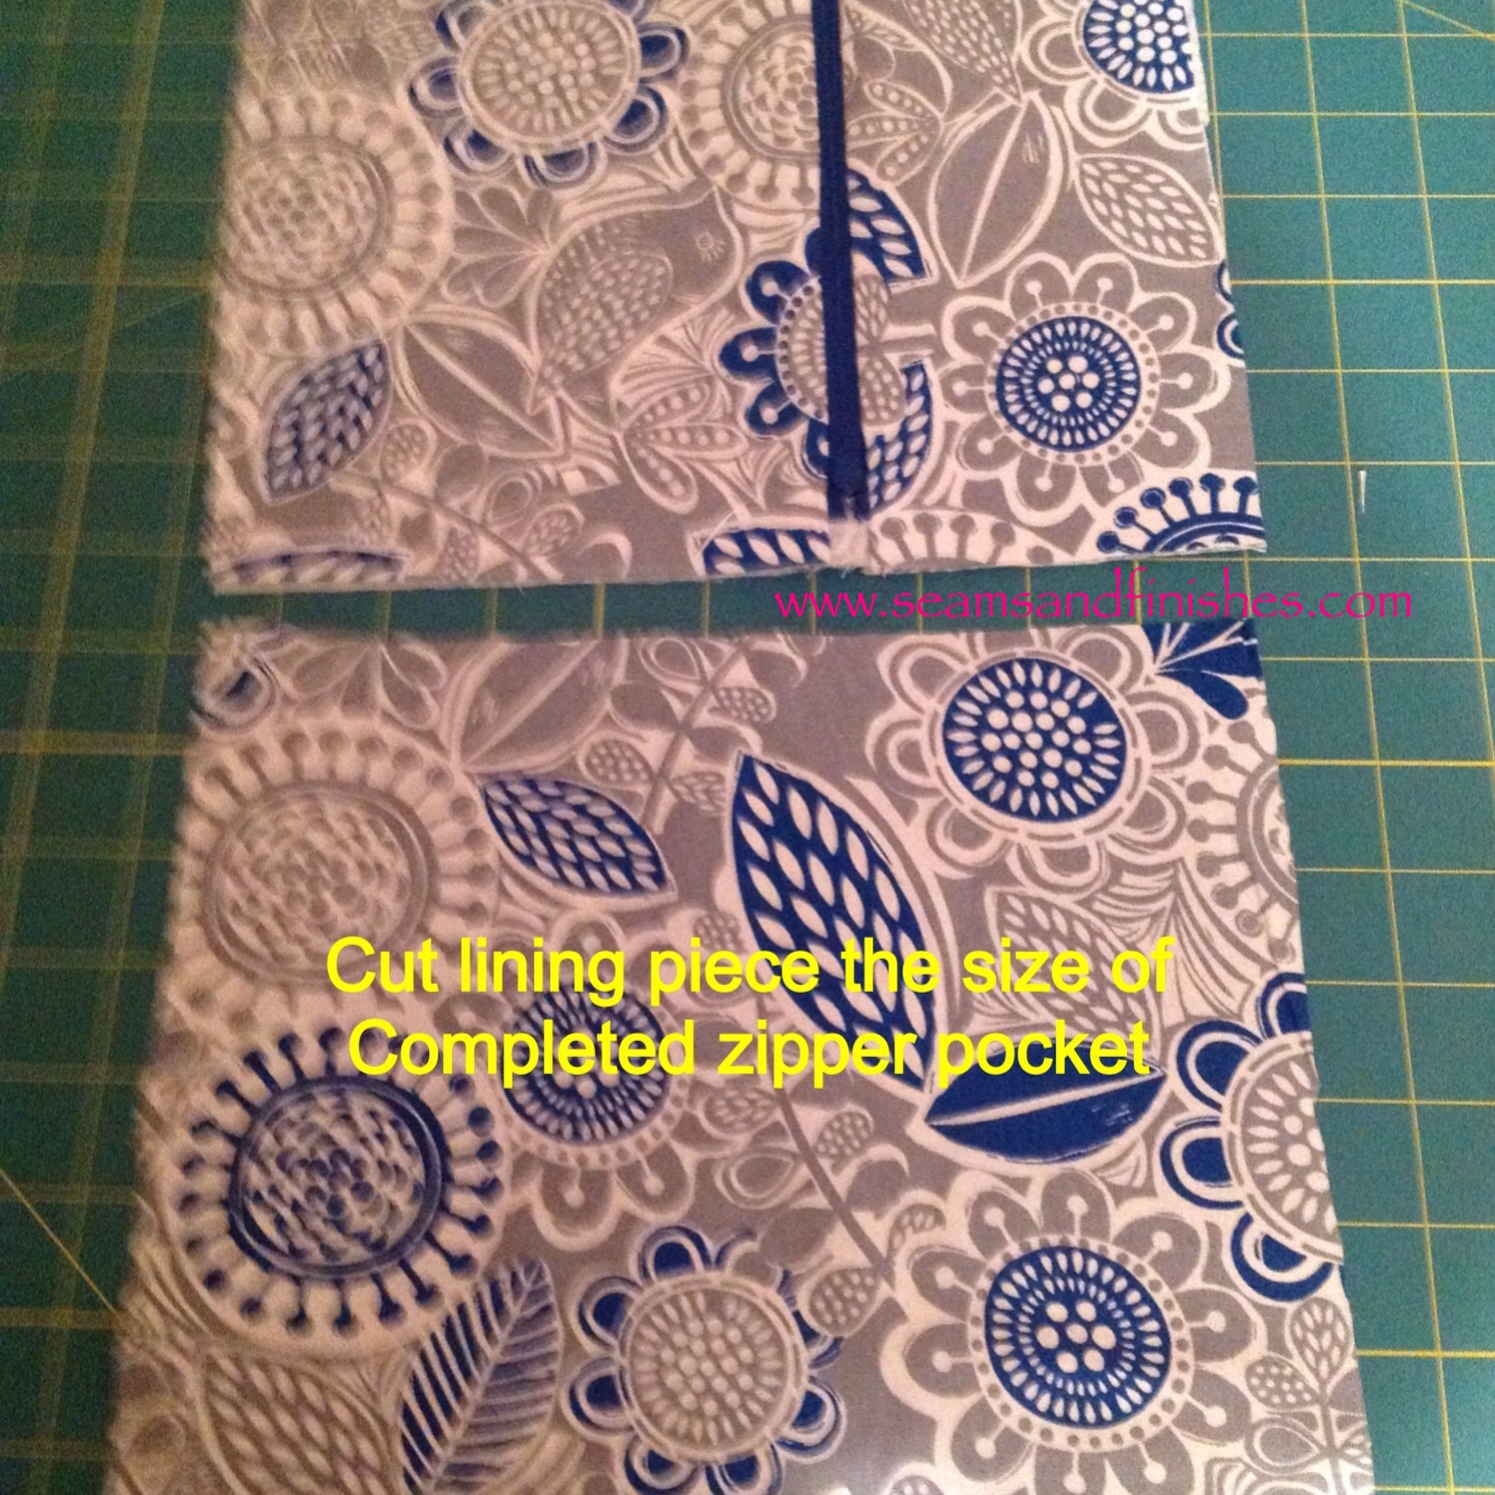
Place WRONG side of this piece on top the right side of the zipper pocket. Stitch together with 1/4″ seam on 3 sides, leaving top open. Trim corners & turn to right side & press. When this pocket assembly is stitched to the lining with 1/4″ seam, there will be no raw edges inside, and the right side of the lining is visible when you unzip the pocket!

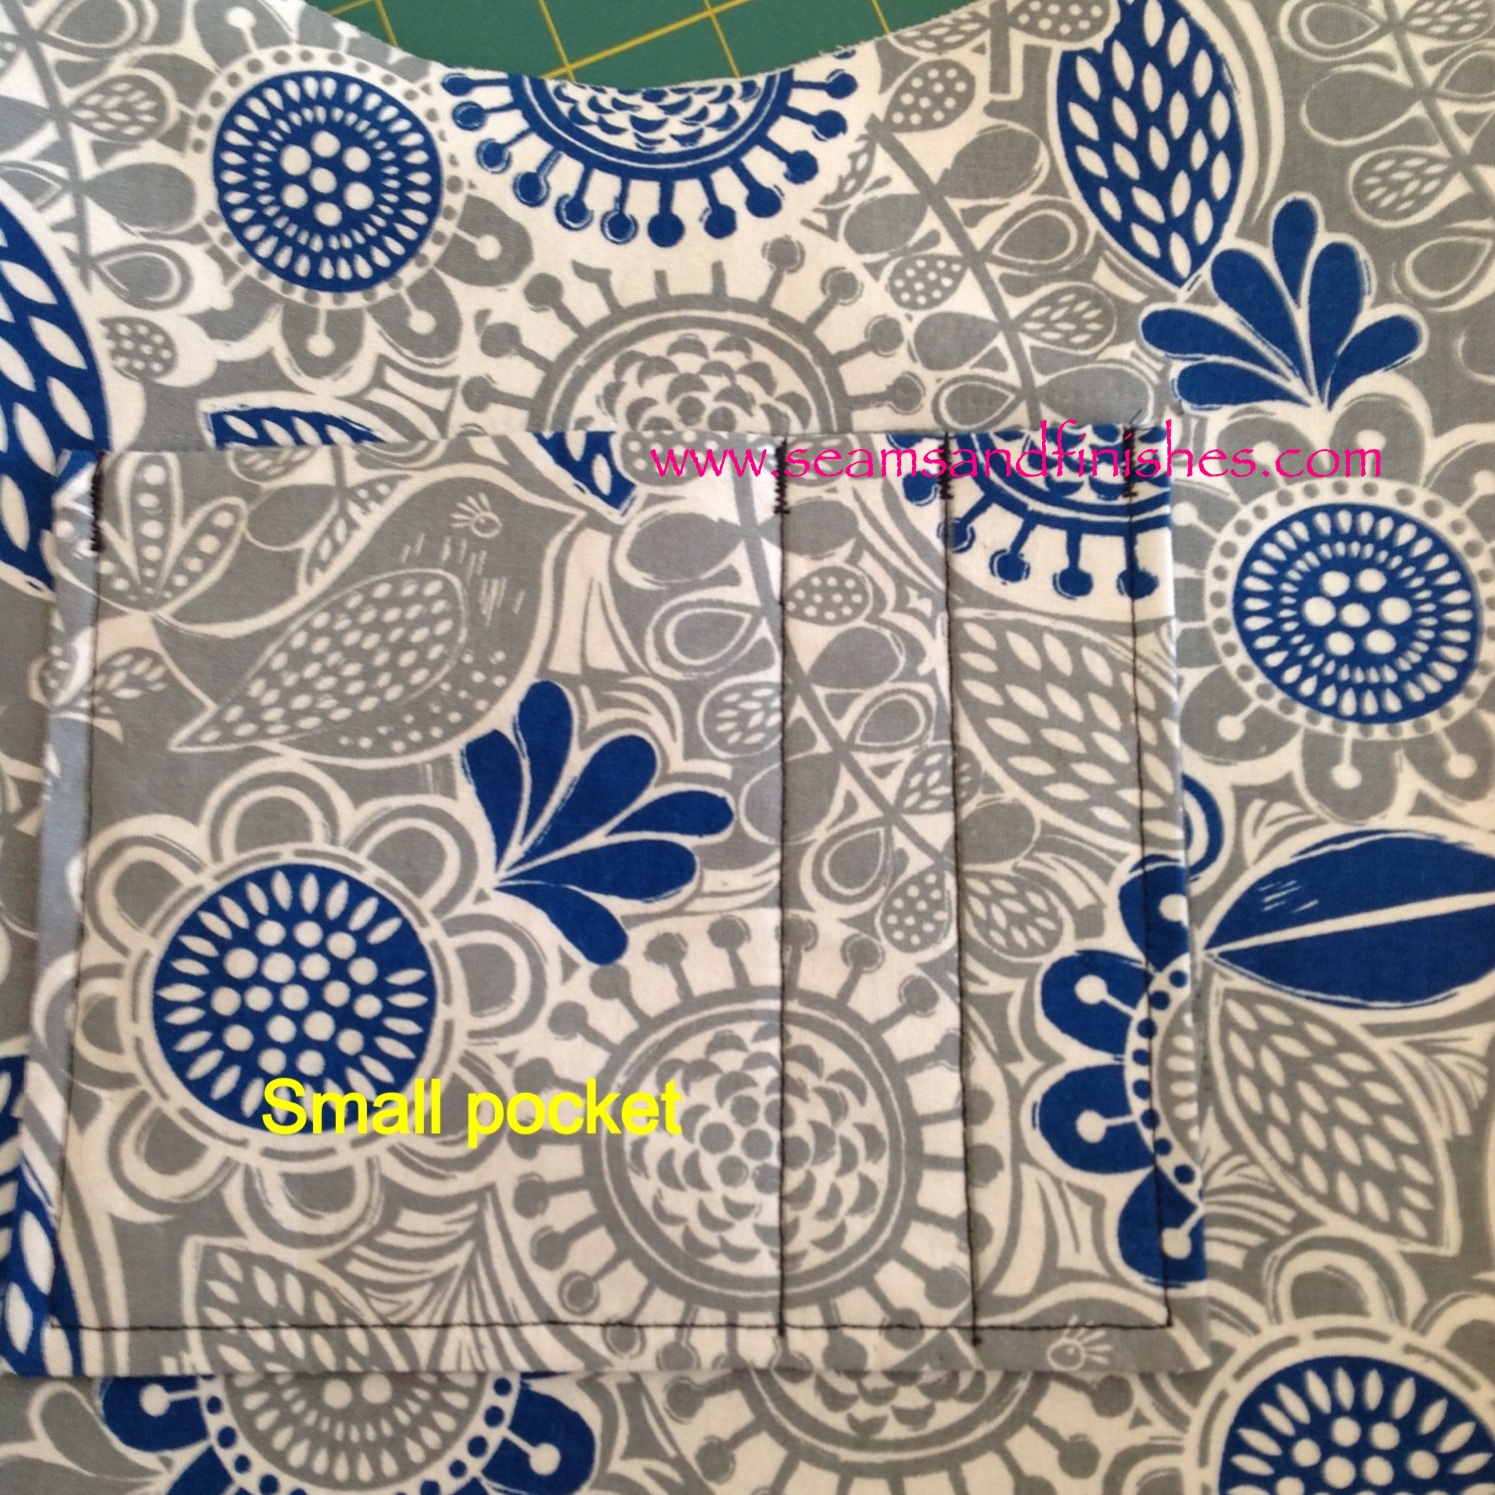
Small pocket stitched to lining (reinforced with bar tacks).


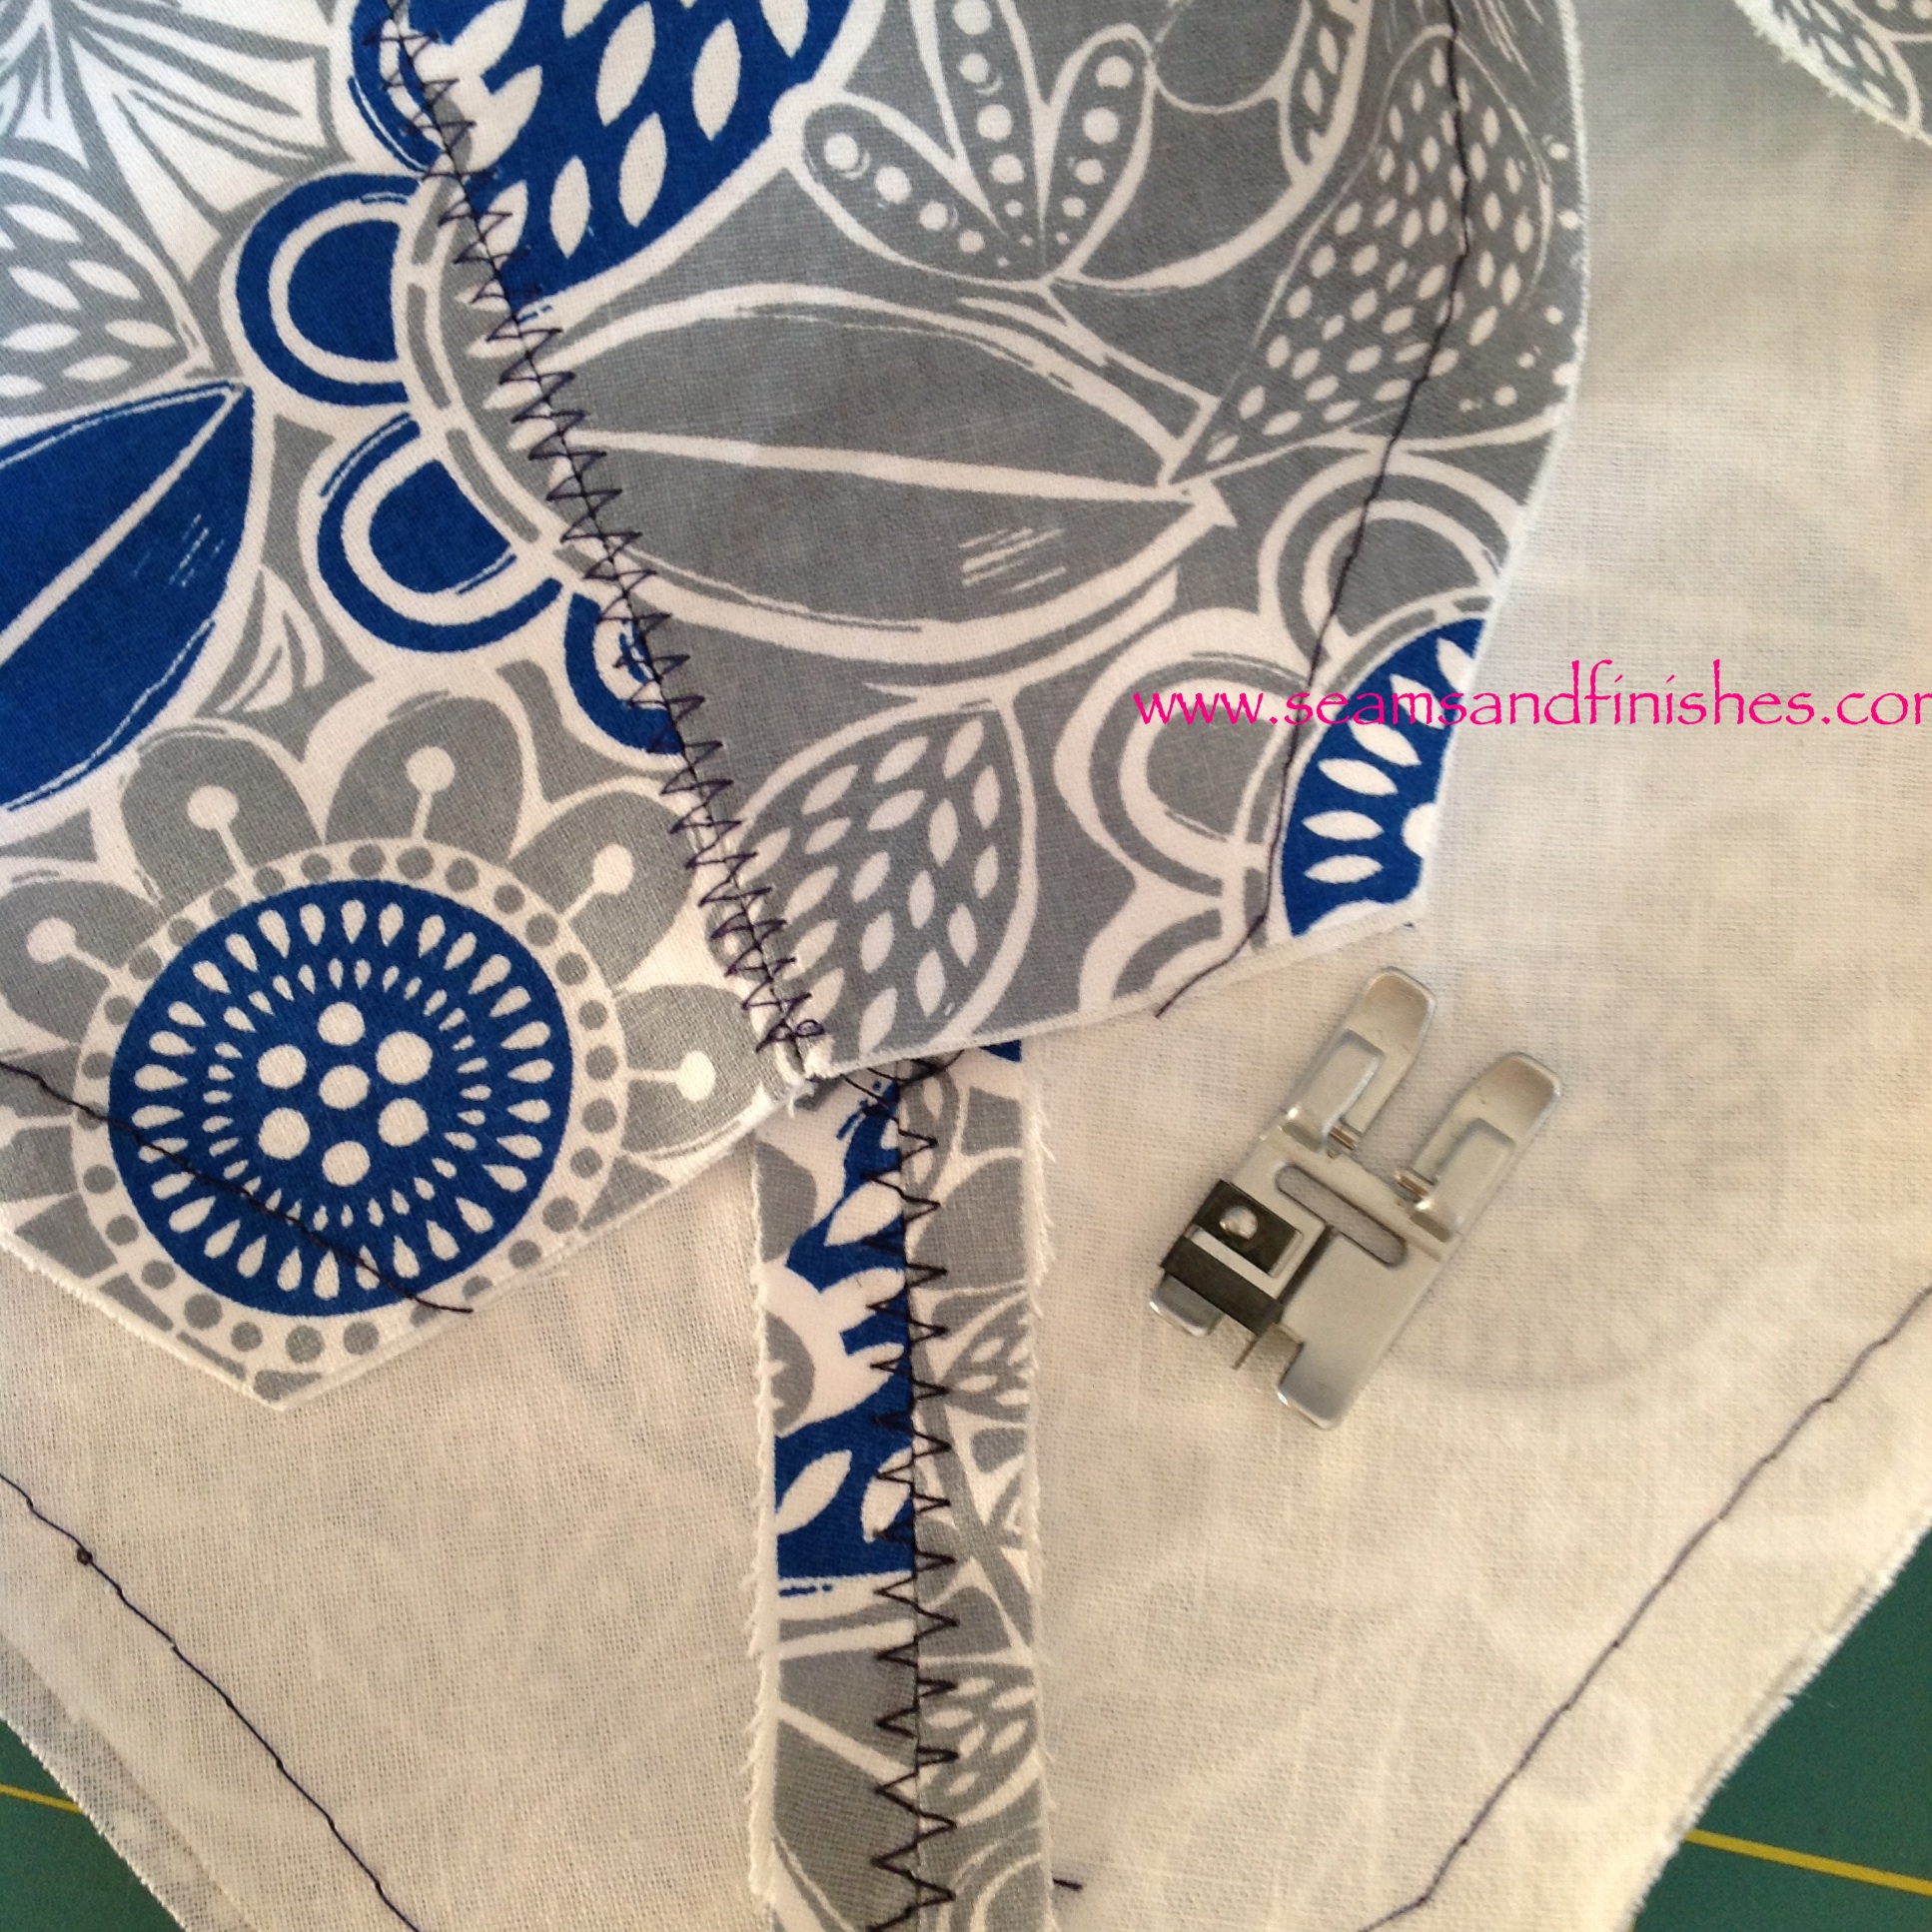
Once the pockets were stitched to the front & back lining pieces, it was time to stitch the front & back together. After doing this, I pressed the seams open and used a 2-step zig-zag stitch along the seam to keep it open.

Now, onto the bag, itself! I was able to find some 10 oz. wt denim at Joann's and that was perfect, because I wanted to make this bag very casual and do some machine embroidery on the front! (I'll get to that, shortly!)

Embroidery done and bag assembled, here are a few details:

  • Top stitched the seam using a 6.0/100 needle with regular thread. I have not had a great deal of luck using top-stitching thread in the past. If you like more definition, you can thread the needles with two of the same weight thread to get a slightly thicker appearance or use 2 different colors in the same needle for an even different look!
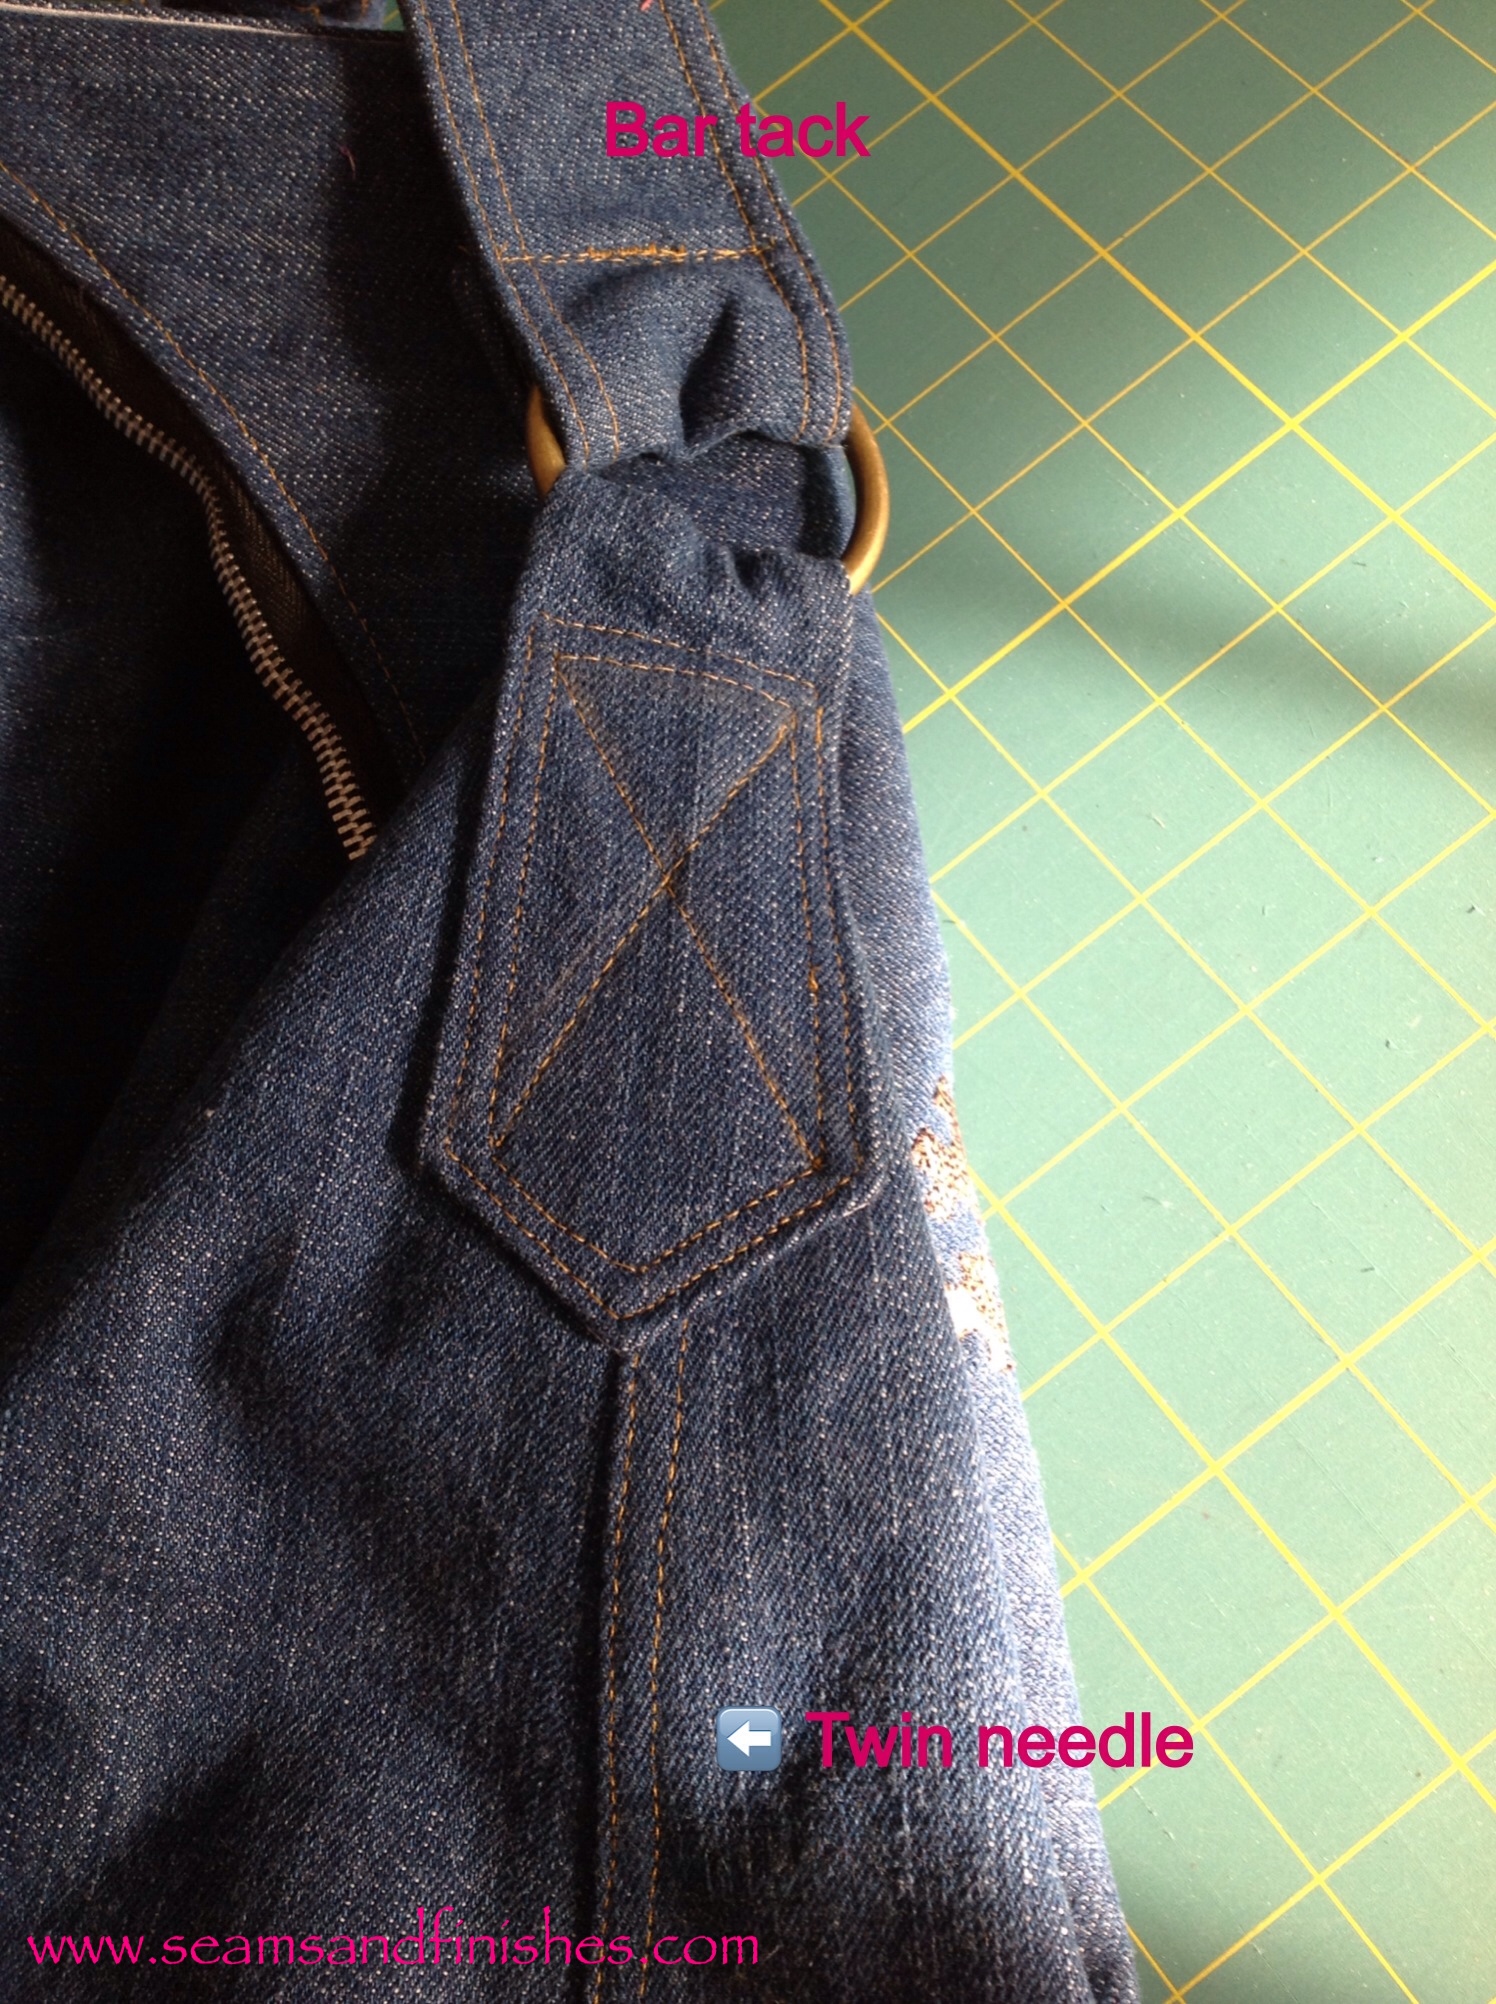
  • For top stitching handle & anchors and construction, a jeans/denim size 100 needle was used.
  • Bar tacks were added on the handle after I attached it to the ring for extra security, and it goes along with a jeans style!
  • The 2″ rings were ordered from Pacific Trimming.


Here is the finished bag!

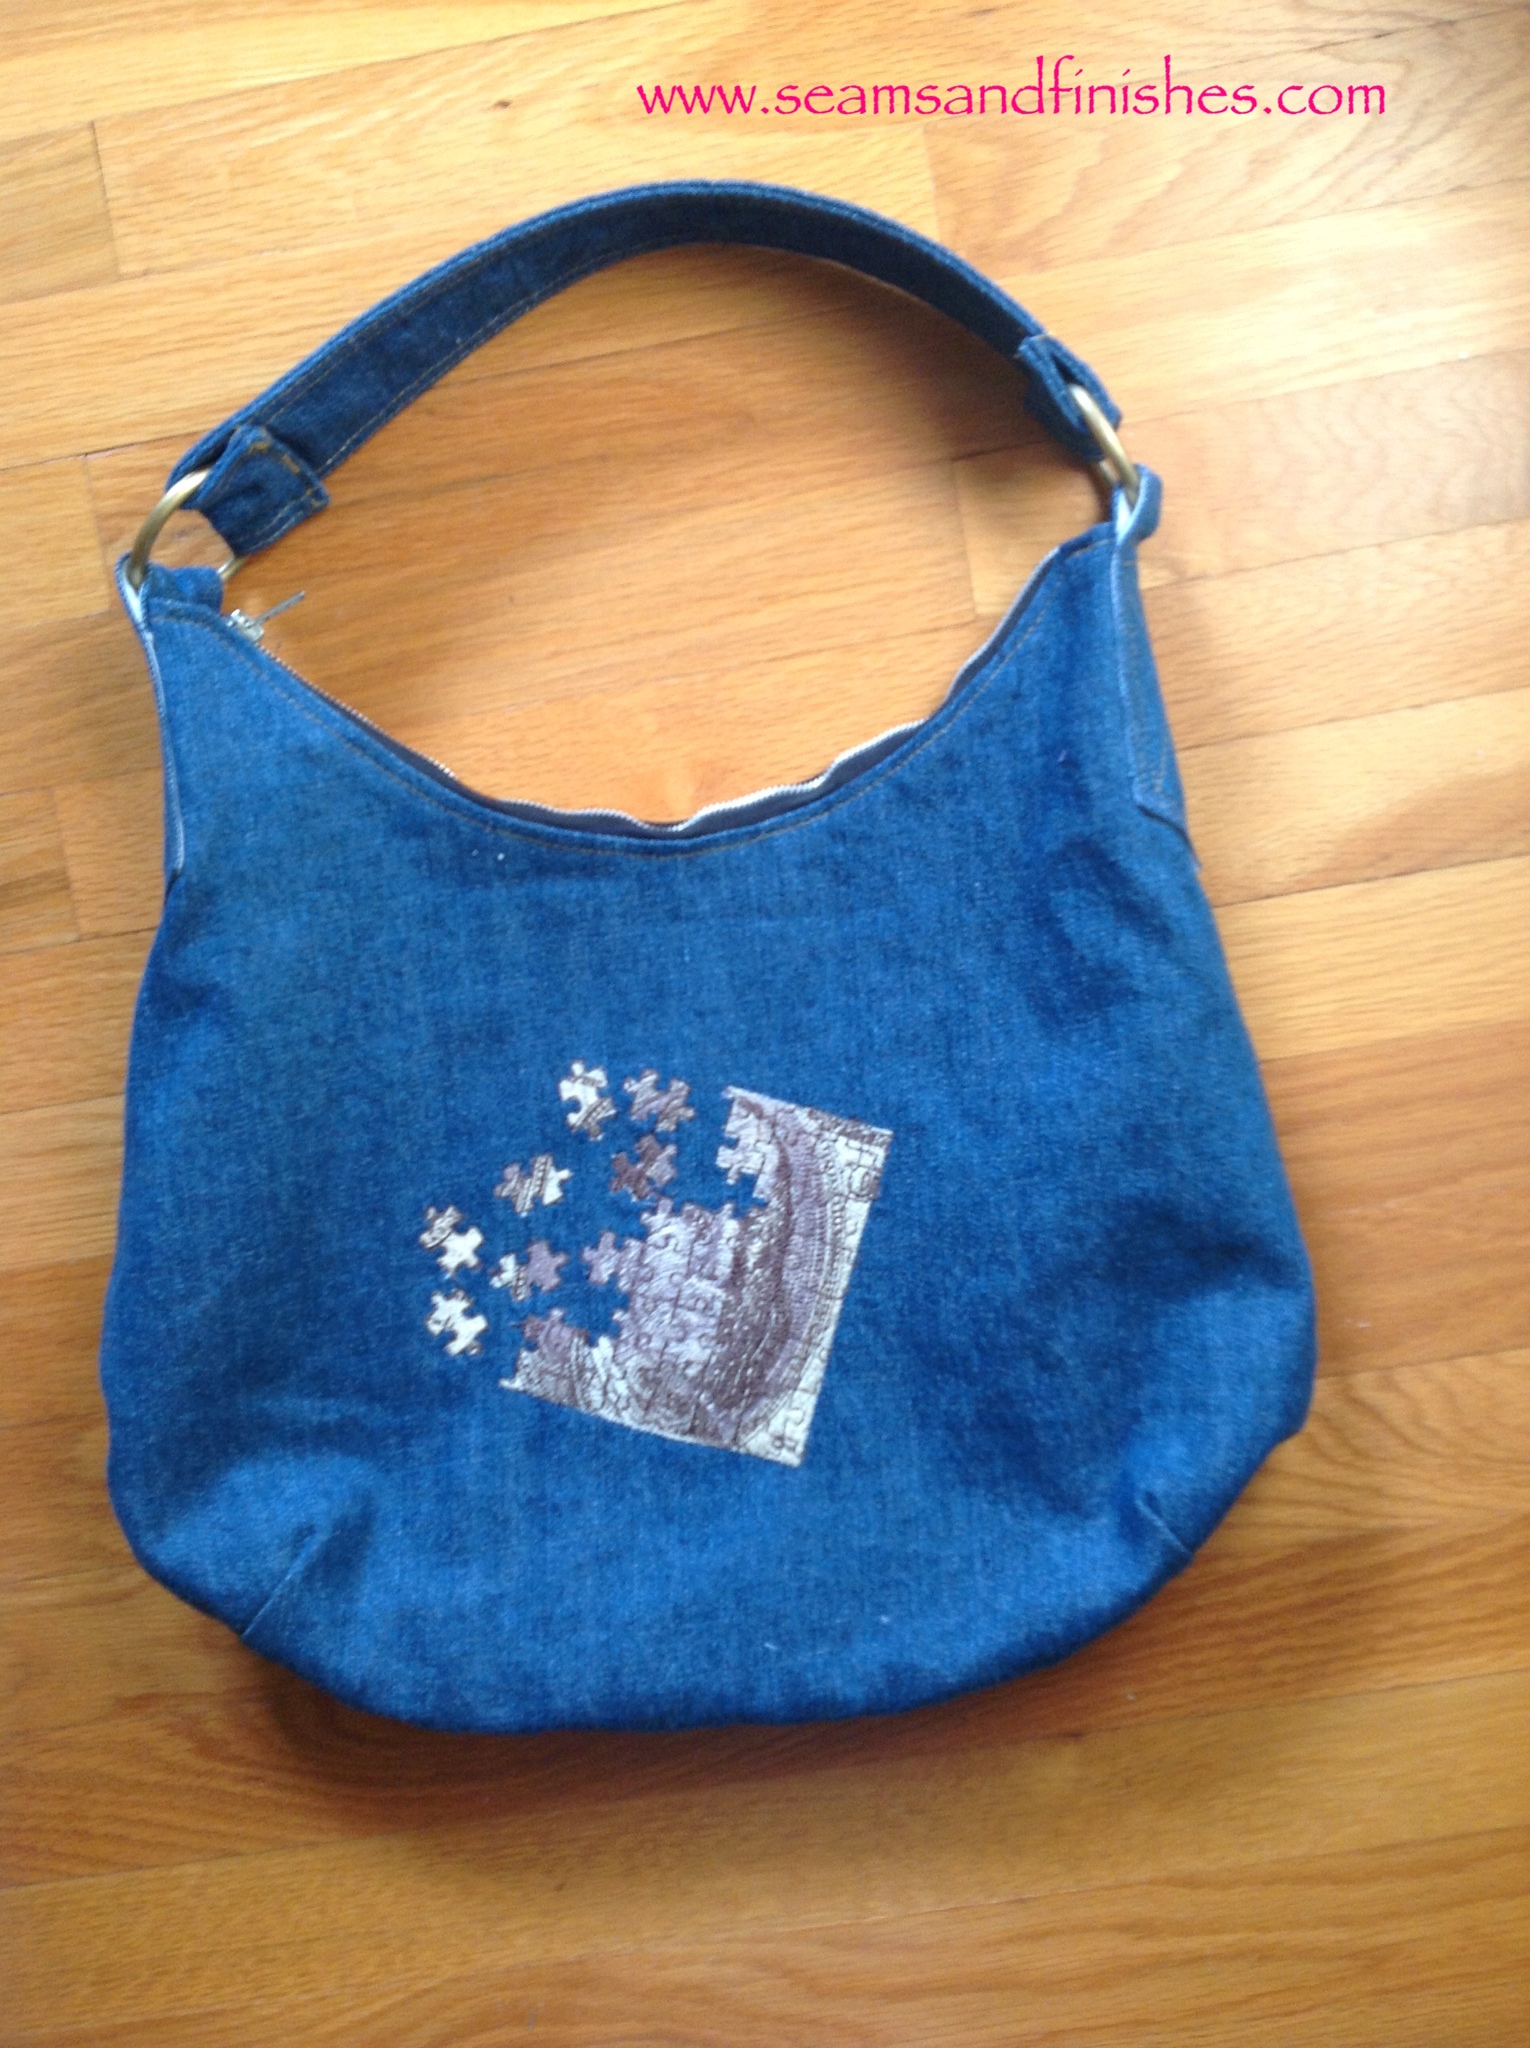
The design is from “Worth Every Penny”, a collection found here.

And here is the bag in action!


National Sewing Month

Hi Everyone!

Inspired by Sew Mama Sew, and National Sewing Month I'm sharing a sewing tool and tip with you today on Centered Zipper Application!

The Tools:

  • 1/2″ wide frosted cellophane tape
  • plastic 1/8″ see-through ruler
  • waxed paper
  • pen or permanent marker

The Process:

  • Machine-baste your zipper opening closed as per most zipper directions and press the basted seam open.
  • Next, open the zipper and placing teeth along basting, machine baste the zipper to the seam allowance only (usual zipper directions)
  • Using your zipper measurement as a guide, stick that length of the frosted tape to a piece of waxed paper.
  • Draw a line down the center of the tape using the ruler.
Centered zipper

Preparing the tape

  • Now, carefully creep the tape along the basted opening so that the line drawn is right on top of the basting line.
  • Topstitch your zipper, peel off the tape and re-stick the tape to the waxed paper for the next time!

Centered zipper

Top stitching

Centered zipper

All stitched

Centered zipper

Finished


A Few Programming Notes:

  • Selecting a zipper which is longer than what you need (as I did here) will eliminate “zipper gymnastics” of trying to get around the zipper tab at the top. You will cut-off the extra zipper tape AFTER you sew across the top of the zipper.
  • The top-stitch length is 3-3.5 mm, and I used a lighter thread color for illustration.
  • As far as which direction to sew the zipper, there are two schools of thought: Stitch from the bottom to the top, or just stitch all around starting and ending at the top. Whatever works for you and your fabric is what is important!

The first picture above shows the beginning of “Stitch from the bottom, etc.” When I did the second side, I was not happy with how it looked so I took it out and re-did it using the “Start and end at the top” method.

In choosing to start at the bottom, it is crucial to pull your threads to the inside and hand-tie them so no one knows where you stopped and started!

Take a look at other tips shared at Sew Mama Sew and celebrate National Sewing month with a new tool or technique!


Are You Ready for Soccer?

I have a special birthday party to attend next week. The Birthday Boy, born on 9/9/09, will proudly tell you that “I’m growing-up. I’m going to be four”

Well, I don’t know where those four years have gone, but I’ve had a collection of embroidery designs for longer than that begging to be used…

Twist.my.arm.

I hunted for these on Ebay after seeing a sweater using several of the designs in Sew News. I was lucky to have found the collection, as it is no longer available from a dealer.

Getting to work!

  • I purchased a Lands’ End scherpa-lined hoodie
  • changed the hair color in the design from black to “blonde”
  • reduced the design density from 11,000 stitches to 9000.

Changing the hair color required “zooming-in” on the design and viewing a simulation of the stitch-out on the computer. As I watched the player, I was able to insert a new color, and then resume the black thread color. Getting the stops in the right place is important, so that a yellow outline on the soccer player and a yellow soccer ball can be avoided!

Hooping the hoodie:

As I mentioned, this sweatshirt has a hood, and a scherpa lining. Ideally sweatshirts should be “hooped”, but because of the sleeve, hood and bulkiness of this project I did the following:

  • affixed a cutaway mesh stabilizer to the inside of the sweatshirt (scherpa) using a spray adhesive
  • hooped a washaway sticky stabilizer, scored it and peeled the topping away to expose the “sticky”
  • taped my printed design template to the hoodie and centered it in the hoop

Cutaway stabilizers are recommended for embroidering on knits so that the stitches don’t wobble and distort during the stitching and the design is well-supported on the garment.

At the Machine:

Attach the hoop and “fine-tune” so the needle penetrates at the center of the design. Baste around the design, if your machine does this, so that the garment & stabilizer are attached.  I recorded the coordinates of the center after adjusting, just in case. I’m living dangerously and did not do a test stitch-out…

Some people leave their machines to embroider by themselves, unsupervised.

Some people use baby monitors to listen for problems in “Embroideryland.”

I am not in either of those camps. I watch like a hawk. I hold my breath (sometimes, like today) so that I can hear the clunking of a bird’s nest in-the-making, or watch the innocent needle falling out from the vibration, or having to re-thread after a thread break. All of these things happened today.

After tending to these hiccups, I came close to needing the initially recorded coordinates having found it necessary to remove the hoop from the machine while performing minor surgery (during the final color block, of course!)

Ninety minutes after sitting at the machine, we have success.

  • trim jump stitches
  • trim stabilizer
  • press & admire

Ayden will be ready for soccer.

Two Cabaritas!

It’s a “piece of cake”. Actually, it’s one of the recently introduced Cake patterns Riffs and I have just completed not one, but two of these delightful knit tops!

This design caught my eye when I saw Steph wearing a cute chevron-striped top on her blog. I was thrilled when it was released in pattern form!

Lets take a look.

The Cabarita is intended for intermediate to advanced sewers. There are minimal directions provided, so if you haven’t gotten your feet wet in working with knits, I would hold off a bit before trying this, but don’t wait too long!

In addition, the pattern features customizable fit options allowing you to trace your pattern size by connecting the markings on the pattern for your desired bust, waist and hip measurements. What could be easier?

For me, the key element in this design is choosing a striped fabric. I found both a navy stripe cotton jersey blend and a nautical cotton/spandex blend from Girl Charlee fabrics.


What to do next?

You’ve probably heard it before, but…pre-washing the fabric will allow the fabric to shrink , if it is going to, (no bad surprises later). And since most fabrics are treated with sizing (think hairspray) to make the fabric attractive, this can cause the needle to bounce off the fabric resulting in skipped stitches. (Not to mention the fact that this sizing flakes off into your machine, yuk!)

And speaking of the machine- a ballpoint needle. A ballpoint needle can slip through the loops of a knit where a regular machine needle might damage the knit or cause the needle to skip. (who needs that aggravation?)

Pattern Layout and Cutting

This is the part of sewing which is probably the “least thrilling” to most people. However, careful pattern layout leads to a fabulous outcome, so here we go!

Because I am working with a striped fabric, I cut it out in a single layer so that I could be sure to have my stripes matching. The pattern has markings showing you where to place your pattern pieces along the stripes (crosswise grain;stretch goes around the body). In addition, since some knits are created “in the round” and then split along one side, it is conceivable that a stripe could be on a downward spiral. Cutting on a single thickness keeps everything out in the open and you can see where your stripes are going.

I placed the front piece face-down on the fabric, cut around it, starting at the hem at the CF and ending at the neckline. Then, with a ruler and my Frixion pen drew a couple of guidelines at the neckline and hem along the CF to aid in lining-up the pattern for cutting the other half of the front.

When cutting out the back pieces on a single layer, remind yourself to flip the pattern piece over so you don’t end up with two of the same sides. Painter’s tape is a staple in my sewing room and it is a quick way to mark the wrong sides of fabric and pattern pieces and easily removed without leaving a trace (stealth sewing).

The pattern does not call for interfacing, but I chose to interface the collar with a fusible knit interfacing. After cooling, I trimmed the outside curve with pinking shears to eliminate bulk and to blur any shadow of the seam. I also under stitched this seam to the collar facing (the collar piece without the interfacing). It is not necessary to do this, but I lIke to keep the edge rolled underneath. It is usually difficult to get all the way into the corners of the collar, but that’s okay, whatever distance you achieve is fine.

Tips for under stitching:

Trim, grade, clip and then press your seam towards the garment facing. Place your garment on the machine so that the seam allowance is against the feed dogs and the facing is on the top.

Stitch about 1/8″ or so away from the seam onto the facing. If you have a stitch-in-the ditch or edge joining foot, it makes the job so much easier ;). Under stitching attaches your seam to the facing and the collar has a beautiful roll.

Side Seams:

As recommend, I used the knit stitch on my machine for most of the seams and used my serger to finish them. I used the serger alone for the shoulder/sleeve seam, and rather than attach the sleeve band before sewing the under arm seam, I preferred to sew the band into a circle and then attach in-the-round. I think it looks better.

Top Stitching Tips

Lengthen your machine stitch to 3-3.5mm, and if you have a machine foot as above, you have it made!

Hem Trick:

Do you have partially filled bobbins hanging around? Of course you do. Now is your chance to recycle that thread! Set your machine to a basting stitch and baste your top along your desired hem depth. Press up along that line and you are all set to hem.

I used my coverstitch machine, but I didn’t always have one. Twin needle stitching can give the same visual appearance as RTW, so you can duplicate the look 🙂

What do I think?

I love the unique style of this top, and as a bonus, you can wear it with the collar in front or in back!

My best description of this top would be Classy Casual. It’s as comfortable as a T-shirt, but it certainly doesn’t look like one!

Related articles